Plain Linux Hypervisor with KVM
Introduction
Many professionals and enthusiasts run hypervisors in one form or another, at work and/or at home. Depending on personal taste or business decisions you may see them talk about the common choices for SMBs, VMware ESXi or Microsoft Hyper-V. Some nerds will sing the praises of Proxmox VE, which is an open-source effort to replicate - and, some might argue, in some aspects exceed - the hyperconverged infrastructure capabilities of a VMware vSphere or Microsoft Hyper-V environment.
Personally, I would say that at least for a smaller environment you really can’t go wrong with a plain Linux based server running KVM:
- Linux server OS hardware compatibility wildly exceeds that of VMware ESXi, which matters if you’re not actively making sure that your hardware is in the VMware Hardware Compatibility List for the hypervisor version you’re attempting to run.
- Out-of-the-box, common Linux Server distributions have a smaller footprint than Windows Server does - especially if you’re not comfortable running Windows Server Core.
- If you do decide to run Windows Server Core, it’s still way easier to find help and howtos on managing aspects of Linux from the console than it is for Windows/Powershell.
- Linux beats both ESXi and Windows in terms of storage management capability and choice of file systems:
- ESXi requires you to either run a compatible physical storage controller, or to present server storage from an NFS or ISCSI server - in its hackiest form a VM presenting back the server’s built-in storage back to the server itself.
- Windows has two options for file systems, one that’s still not recommended to use in many cases (ReFS), and one that’s limited in modern features (NTFS); neither of which is a good choice for software RAID, meaning that in practice you really have the same limitations as in ESXi: You’ll suffer unless you have a good hardware controller, and if you do you’ll need to get an identical one to get your data back in case of a hardware failure.
- Running plain Linux - like running a Windows server - allows you to manage your server as you would any other general purpose machine with the same OS, using the same tooling. This was my gripe with Proxmox VE, which ultimately caused me to replace that system with regular Ubuntu Server.
Is it difficult?
This is probably the question most people will ask themselves: What’s the cost/benefit ratio in terms of difficulty of choosing one product over another?
Now you’ve got to keep in mind that you’ve already read this far. The thought of setting up a hypervisor obviously has crossed your mind.
The threshold to setting up a proper environment for KVM isn’t particularly high: You need a server running Linux, you need to configure a network bridge, and you need somewhere to store your virtual machines. The required steps are detailed below.
And of course using KVM on top of a Linux server does not prevent you from using graphical frontends to manage your virtual machines, if that’s your cup of tea. A program like Virt-Manager provides you with a nice view of all VMs running on a host, the ability to manipulate their virtual hardware, and of course to control them remotely over Spice or VNC. But in addition to that, the Linux underpinnings of such a hypervisor means you get fantastic support for automating your virtual machine management.
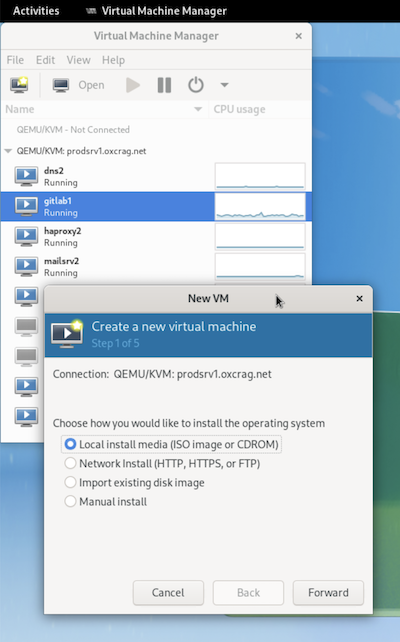 |
|---|
| Virtual Machine Manager in action |
Let’s start setting something up.
KVM Configuration
Base packages
The first thing to do is of course to ensure we have the necessary packages installed.
sudo apt-get install qemu-kvm libvirt-daemon-system libvirt-clients libvirt-daemon-driver-storage-zfs bridge-utils(The ZFS storage driver is optional unless that’s the file system you’ve chosen for your hypervisor, of course)
Networking
To allow virtual machines to coexist on the same network as our hypervisor, we’ll set up a network bridge. We’ll copy the default Netplan configuration and perform our changes:
cd /etc/netplan
sudo cp 00-installer-config.yaml 01-kvmbridge.yaml
Let’s edit the new file:
/etc/netplan/01-kvmbridge.yaml
---
network:
  ethernets:
    enp2s0f0:
      dhcp4: false
      #    enp2s0f1:
      #      dhcp4: true
      #    enp3s0:
      #      dhcp4: true
      #  version: 2
      #
  bridges:
    br0:
      interfaces: [enp2s0f0]
      dhcp4: true
      mtu: 1500
      parameters:
        stp: true
        forward-delay: 15
Some comments on the file contents:
- I’m letting the bridge interface become the main interface for the hypervisor host to speak to the network. Note that your interface names will likely differ. Use
ip link showto display the interface names available to you. - I have a small network at home and do not use spanning tree or protocols with a similar purpose, but as kvm’s bridge interface uses spanning tree by default, that’s what I’ve configured for mine too.
After writing the file, test the connection using sudo netplan try - preferably via a local console, as you will lose your network connection when the bridge interface takes over from the plain NIC.
If everything looks good, commit the configuration by entering sudo netplan apply.
At this point the host is ready to route traffic to virtual machines, but we still need to tell KVM/QEMU to utilize the host’s bridge interface.
Configure KVM to use our network bridge
Create a file, ~/kvmbridge.xml and make it look like this:
~/kvmbridge.xml
<network>
  <name>host-bridge</name>
  <forward mode="bridge"/>
  <bridge name="br0"/>
</network>
Enable the bridge in KVM by running the following commands:
sudo virsh net-define ~/kvmbridge.xml
sudo virsh net-start host-bridge
sudo virsh net-autostart host-bridge
Check that everything looks OK:
sudo virsh net-list --allThe output should look something like this:
 Name          State    Autostart   Persistent
------------------------------------------------
 default       active   yes         yes
 host-bridge   active   yes         yes
We should now be able to remove the default bridge as it won’t be needed:
sudo virsh net-destroy default
sudo virsh net-undefine default
Configure VM storage pools
The last part of turning our server into a hypervisor is to tell it where to store the disk images for our virtual machines by default. In my case I have a ZFS storage pool called ssdpool which I’m going to use.
First we need to undefine the out-of-the-box default storage location.
sudo virsh pool-destroy default
sudo virsh pool-undefine default
Then we need to create somewhere to store the machines. Again, I’m using ZFS, so I’ll create a file system in my ssdpool storage pool.
sudo zfs create backuppool/vmimagesThe next step is to create a file, ~/kvmstorage.xml, and give it the following contents:
~/kvmstorage.xml
<pool type="dir">
  <name>default</name>
  <target>
    <path>/ssdpool/vmimages</path>
  </target>
</pool>
This configuration is imported similarly to how we worked with networking earlier:
sudo virsh pool-define ~/kvmstorage.xml
sudo virsh pool-start default
sudo virsh pool-autostart default
Again we can verify what we’ve done:
sudo virsh pool-list The output should look like this:
 Name       State    Autostart
--------------------------------
 default    active   yes
Conclusion
There’s really not much more to it. Our hypervisor works and if we create a virtual machine on the host, the network and storage defaults should be fine now. This is a great setup for a smallish environment where some downtime is acceptable, whether for maintenance or while manually moving load to a secondary host in case of hardware failure.
The obvious next steps from here are to set up backups - if you’re using ZFS you’re already in a good starting position - and to automate recurring tasks.